Contents
- PyQt5 Tutorial - 파이썬으로 만드는 나만의 GUI 프로그램
- 1. PyQt5 소개 (Introduction)
- 2. PyQt5 설치 (Installation)
- 3. PyQt5 기초 (Basics)
- 4. PyQt5 레이아웃 (Layout)
- 5. PyQt5 위젯 (Widget)
- QPushButton
- QLabel
- QCheckBox
- QRadioButton
- QComboBox
- QLineEdit
- QLineEdit (Advanced)
- QProgressBar
- QSlider & QDial
- QSplitter
- QGroupBox
- QTabWidget
- QTabWidget (Advanced)
- QPixmap
- QCalendarWidget
- QSpinBox
- QDoubleSpinBox
- QDateEdit
- QTimeEdit
- QDateTimeEdit
- QTextBrowser
- QTextBrowser (Advanced)
- QTextEdit
- QTableWidget
- QTableWidget (Advanced)
- 6. PyQt5 다이얼로그 (Dialog)
- 7. PyQt5 시그널과 슬롯 (Signal&Slot)
- 8. PyQt5 그림 그리기 (Updated)
- 9. PyQt5 실행파일 만들기 (PyInstaller)
- 10. PyQt5 프로그램 예제 (Updated)
- ▷ PDF ebook
Tutorials
- Python Tutorial
- NumPy Tutorial
- Matplotlib Tutorial
- PyQt5 Tutorial
- BeautifulSoup Tutorial
- xlrd/xlwt Tutorial
- Pillow Tutorial
- Googletrans Tutorial
- PyWin32 Tutorial
- PyAutoGUI Tutorial
- Pyperclip Tutorial
- TensorFlow Tutorial
- Tips and Examples
현 그리기 (drawChord)
drawChord()는 현을 그리는데 사용합니다.
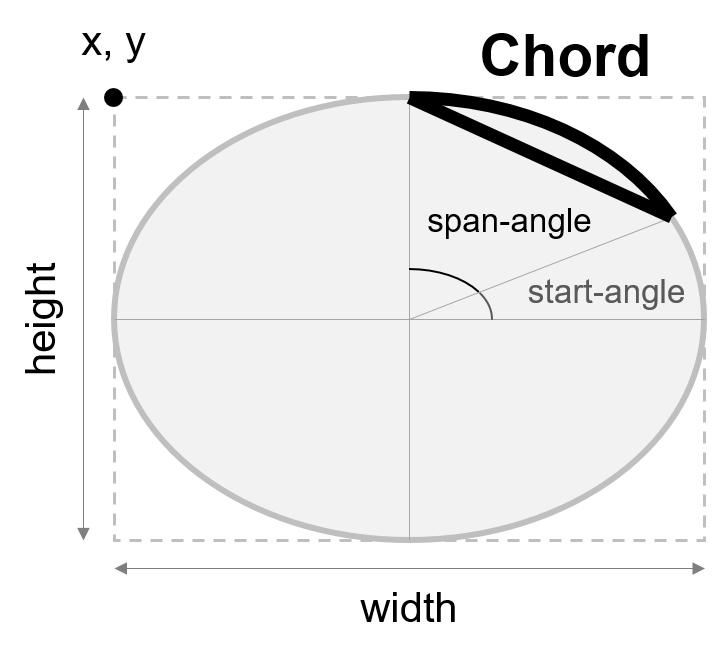
drawArc()와 마찬가지로 drawChord()에 x, y, width, height, start-angle, span-angle의 순서로 숫자를 입력합니다.
아래 그림을 참고하세요.
start-angle, span-angle에 각도를 숫자로 입력할 때 0 (0도)부터 5760 (360도)까지의 숫자를 입력합니다.
예를 들어 30도를 나타내고 싶다면 30 * 16을 입력합니다.
예제
## Ex 8-8. 현 그리기 (drawChord).

import sys
from PyQt5.QtWidgets import QWidget, QApplication
from PyQt5.QtGui import QPainter, QPen, QColor, QBrush
from PyQt5.QtCore import Qt


class MyApp(QWidget):

    def __init__(self):
        super().__init__()
        self.initUI()

    def initUI(self):
        self.setGeometry(300, 300, 400, 300)
        self.setWindowTitle('drawChord')
        self.show()

    def paintEvent(self, e):
        qp = QPainter()
        qp.begin(self)
        self.draw_chord(qp)
        qp.end()

    def draw_chord(self, qp):
        qp.setPen(QPen(Qt.black, 3))
        qp.drawChord(20, 20, 100, 100, 0 * 16, 30 * 16)
        qp.drawText(60, 100, '30°')

        qp.drawChord(150, 20, 100, 100, 0 * 16, 60 * 16)
        qp.drawText(190, 100, '60°')

        qp.drawChord(280, 20, 100, 100, 0 * 16, 90 * 16)
        qp.drawText(320, 100, '90°')

        qp.drawChord(20, 140, 100, 100, 0 * 16, 180 * 16)
        qp.drawText(60, 270, '180°')

        qp.drawChord(150, 140, 100, 100, 0 * 16, 270 * 16)
        qp.drawText(190, 270, '270°')

        qp.drawChord(280, 140, 100, 100, 0 * 16, 360 * 16)
        qp.drawText(320, 270, '360°')


if __name__ == '__main__':
    app = QApplication(sys.argv)
    ex = MyApp()
    sys.exit(app.exec_())
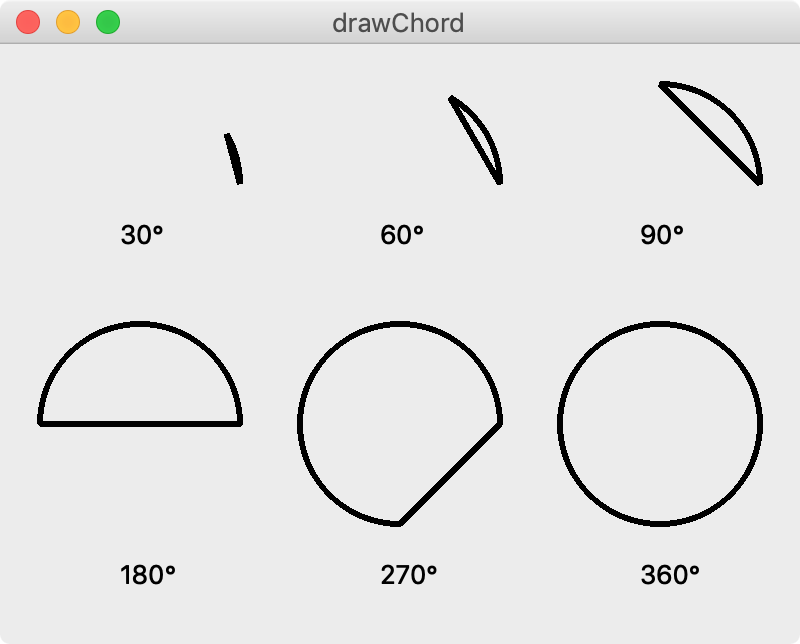
현은 호와 비슷하지만 양 끝점을 연결한 직선이 있습니다.
결과는 아래와 같습니다.

그림 8-8-1. 현 그리기1.
def draw_chord(self, qp):
    brush = QBrush(Qt.SolidPattern)
    qp.setBrush(brush)
    qp.drawChord(20, 10, 100, 100, 30 * 16, 120 * 16)
    qp.drawText(20, 90, 'Qt.SolidPattern')

    brush = QBrush(Qt.Dense1Pattern)
    qp.setBrush(brush)
    qp.drawChord(150, 10, 100, 100, 30 * 16, 120 * 16)
    qp.drawText(150, 90, 'Qt.Dense1Pattern')

    brush = QBrush(Qt.Dense2Pattern)
    qp.setBrush(brush)
    qp.drawChord(280, 10, 100, 100, 30 * 16, 120 * 16)
    qp.drawText(280, 90, 'Qt.Dense2Pattern')

    brush = QBrush(Qt.HorPattern)
    qp.setBrush(brush)
    qp.drawChord(20, 110, 100, 100, 0 * 16, 135 * 16)
    qp.drawText(20, 190, 'Qt.HorPattern')

    brush = QBrush(Qt.VerPattern)
    qp.setBrush(brush)
    qp.drawChord(150, 110, 100, 100, 0 * 16, 135 * 16)
    qp.drawText(150, 190, 'Qt.VerPattern')

    brush = QBrush(Qt.CrossPattern)
    qp.setBrush(brush)
    qp.drawChord(280, 110, 100, 100, 0 * 16, 135 * 16)
    qp.drawText(280, 190, 'Qt.CrossPattern')

    brush = QBrush(Qt.BDiagPattern)
    qp.setBrush(brush)
    qp.drawChord(20, 210, 100, 100, 45 * 16, 135 * 16)
    qp.drawText(20, 290, 'Qt.BDiagPattern')

    brush = QBrush(Qt.FDiagPattern)
    qp.setBrush(brush)
    qp.drawChord(150, 210, 100, 100, 45 * 16, 135 * 16)
    qp.drawText(150, 290, 'Qt.FDiagPattern')

    brush = QBrush(Qt.DiagCrossPattern)
    qp.setBrush(brush)
    qp.drawChord(280, 210, 100, 100, 45 * 16, 135 * 16)
    qp.drawText(270, 290, 'Qt.DiagCrossPattern')
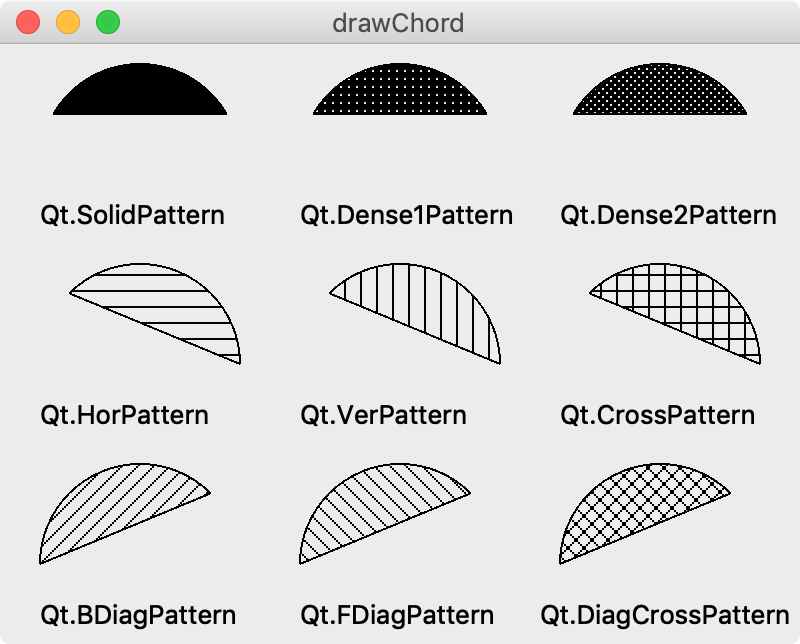
QBrush()와 setBrush()를 이용하면 채우기 패턴을 다양하게 설정할 수 있습니다.
결과는 아래 그림과 같습니다.

그림 8-8-2. 현 그리기2.
이전글/다음글
이전글 : 호 그리기 (drawArc)
다음글 : 파이 그리기 (drawPie)
