Contents
- PyQt5 Tutorial - 파이썬으로 만드는 나만의 GUI 프로그램
- 1. PyQt5 소개 (Introduction)
- 2. PyQt5 설치 (Installation)
- 3. PyQt5 기초 (Basics)
- 4. PyQt5 레이아웃 (Layout)
- 5. PyQt5 위젯 (Widget)
- QPushButton
- QLabel
- QCheckBox
- QRadioButton
- QComboBox
- QLineEdit
- QLineEdit (Advanced)
- QProgressBar
- QSlider & QDial
- QSplitter
- QGroupBox
- QTabWidget
- QTabWidget (Advanced)
- QPixmap
- QCalendarWidget
- QSpinBox
- QDoubleSpinBox
- QDateEdit
- QTimeEdit
- QDateTimeEdit
- QTextBrowser
- QTextBrowser (Advanced)
- QTextEdit
- QTableWidget
- QTableWidget (Advanced)
- 6. PyQt5 다이얼로그 (Dialog)
- 7. PyQt5 시그널과 슬롯 (Signal&Slot)
- 8. PyQt5 그림 그리기 (Updated)
- 9. PyQt5 실행파일 만들기 (PyInstaller)
- 10. PyQt5 프로그램 예제 (Updated)
- ▷ PDF ebook
Tutorials
- Python Tutorial
- NumPy Tutorial
- Matplotlib Tutorial
- PyQt5 Tutorial
- BeautifulSoup Tutorial
- xlrd/xlwt Tutorial
- Pillow Tutorial
- Googletrans Tutorial
- PyWin32 Tutorial
- PyAutoGUI Tutorial
- Pyperclip Tutorial
- TensorFlow Tutorial
- Tips and Examples
점 그리기 (drawPoint)
QPainter의 동작은 일반적으로 위젯의 페인트 이벤트 (paint event)를 통해 이루어집니다.
아래의 예제에서는 drawPoint() 메서드를 이용해서 위젯에 다양한 방식으로 점을 그려 보겠습니다.
예제1
## Ex 8-1-1. 점 그리기1 (drawPoint).

import sys
from PyQt5.QtWidgets import QWidget, QApplication
from PyQt5.QtGui import QPainter, QPen
from PyQt5.QtCore import Qt


class MyApp(QWidget):

    def __init__(self):
        super().__init__()
        self.initUI()

    def initUI(self):
        self.setGeometry(300, 300, 400, 300)
        self.setWindowTitle('Points')
        self.show()

    def paintEvent(self, e):
        qp = QPainter()
        qp.begin(self)
        self.draw_point(qp)
        qp.end()

    def draw_point(self, qp):
        qp.setPen(QPen(Qt.blue,  8))
        qp.drawPoint(self.width()/2, self.height()/2)


if __name__ == '__main__':
    app = QApplication(sys.argv)
    ex = MyApp()
    sys.exit(app.exec_())
아래의 그림과 같이 위젯의 가운데에 파란점이 하나 그려졌습니다.
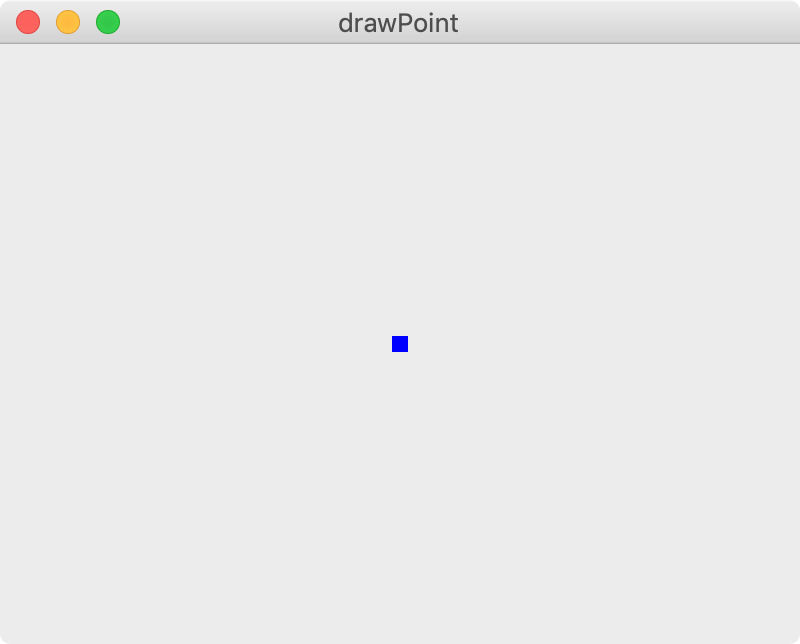
그림 8-1-1. 점 그리기1.
def draw_point(self, qp):
    qp.setPen(QPen(Qt.blue,  8))
    qp.drawPoint(self.width()/2, self.height()/2)
    qp.setPen(QPen(Qt.green, 12))
    qp.drawPoint(self.width()/4, 3*self.height()/4)
    qp.setPen(QPen(Qt.red, 16))
    qp.drawPoint(3 * self.width() / 4, self.height() / 4)
setPen()을 이용해서 점의 색깔과 크기를 조절하면서 세 개의 점을 그렸습니다.
결과는 아래와 같습니다.
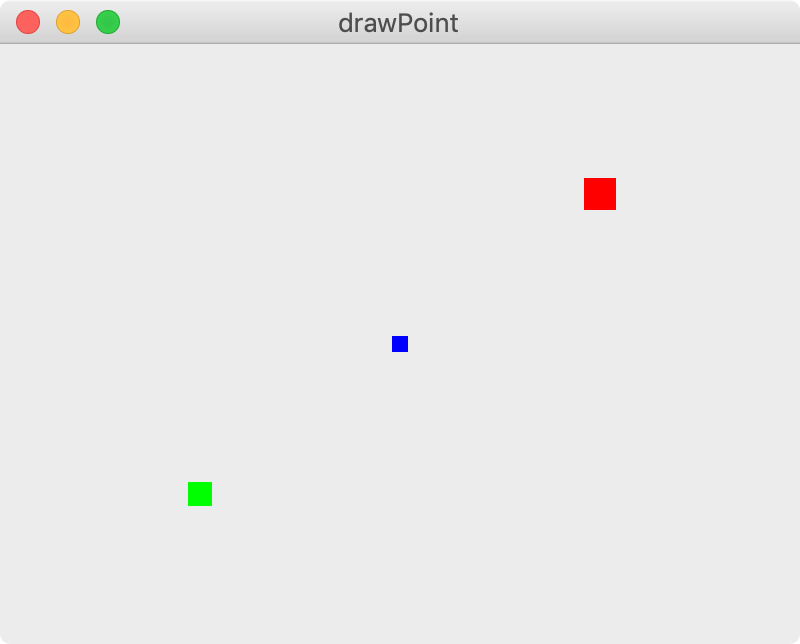
그림 8-1-2. 점 그리기2.
예제2
## Ex 8-1-2. 점 그리기2 (drawPoint).

import sys
from PyQt5.QtWidgets import QWidget, QApplication
from PyQt5.QtGui import QPainter, QPen, QColor
import numpy as np


class MyApp(QWidget):

    def __init__(self):
        super().__init__()
        self.initUI()

    def initUI(self):
        self.setGeometry(300, 300, 400, 300)
        self.setWindowTitle('drawPoint')
        self.show()

    def paintEvent(self, e):
        qp = QPainter()
        qp.begin(self)
        self.draw_point(qp)
        qp.end()

    def draw_point(self, qp):
        pen = QPen()
        colors = ['#D83C5F', '#3CD88F', '#AA5CE3',
                  '#DF4A26', '#AE85F6', '#F7A82E',
                  '#406CF3', '#E9F229', '#29ACF2']
        for i in range(1000):
            pen.setWidth(np.random.randint(1, 15))
            pen.setColor(QColor(np.random.choice(colors)))
            qp.setPen(pen)
            rand_x = 100 * np.random.randn()
            rand_y = 100 * np.random.randn()
            qp.drawPoint(self.width() / 2 + rand_x, self.height() / 2 + rand_y)


if __name__ == '__main__':
    app = QApplication(sys.argv)
    ex = MyApp()
    sys.exit(app.exec_())
setWidth()와 setColor()는 각각 펜 (QPen())의 선의 너비와 색깔을 설정합니다.
numpy.random 모듈을 이용해서 점의 크기와 색깔을 임의로 선택하도록 하고 drawPoint()를 이용해서 점을 그립니다.
(참고: NumPy 난수 생성 (random 모듈))
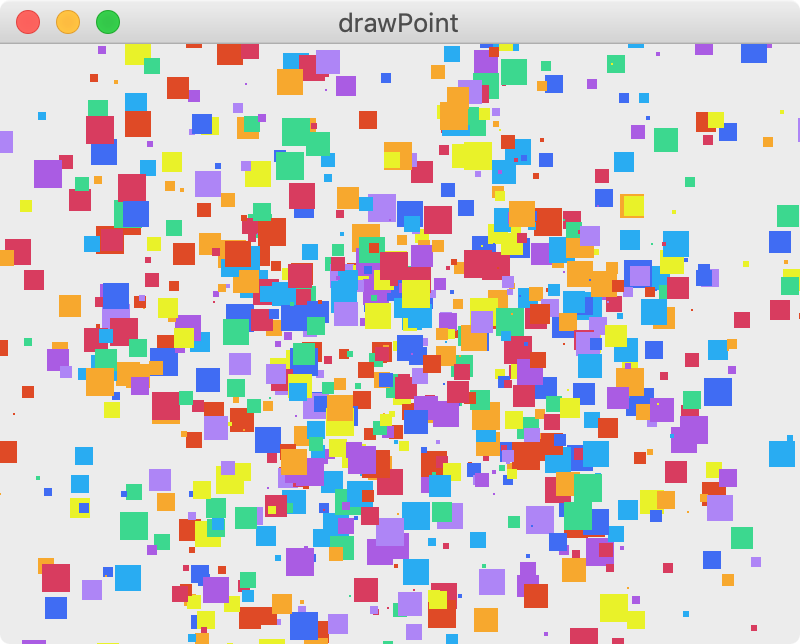
그림 8-1-3. 점 그리기3.
이전글/다음글
다음글 : 직선 그리기 (drawLine)